On March 12, 2001, the module multi-source agreement (MSA) association announced that the XENPAK specification is available for first public review. XENPAK is the first MSA for 10 Gigabit Ethernet. The XENPAK MSA defines a fiber optic or wired transceiver module which conforms to the 10 Gigabit Ethernet standard of the IEEE 802.3 working group. XENPAK transceiver module is a hot-swappable, highly integrated and serial optical transceiver module for 10Gbit/s data transmission applications. It is designed to transmit and receive optical data of link length of 300m, 10km, 20km, 40km and up to 80km. 10G XENPAK solution includes dual fiber XENPAK, CWDM XENPAK and DWDM XENPAK transceivers which enable high port densities for 10 Gigabit Ethernet systems. A 70 pin electrical connector and a duplex SC connector optical interface assure that connectivity is compliant to the XENPAK MSA. CWDM XENPAK transceiver and DWDM XENPAK transceiver are two commonly used XENPAK transceivers in the market.
CWDM XENPAK Transceiver
CWDM XENPAK transceivers are SC duplex receptacle modules and are designed for 10Gb/s Ethernet transmission systems. Wavelengths are selectable from ITU-T standards covering CWDM grid wavelengths: 1470nm, 1490nm, 1510nm, 1530nm, 1550nm, 1570nm, 1590nm and 1610nm. All CWDM XENPAK transceiver modules are MAS compliant, RoHS6 compliant and lead free. Transmitting distance of CWDM XENPAK achieves 40km (ER) and 80km (ZR) with digital diagnostic monitoring. Fiberstore's 10G CWDM XENPAK transceivers are designed for single mode fiber and applied in 10 Gigabit Ethernet and Fibre Channel.
DWDM XENPAK Transceiver
DWDM XENPAK transceivers are SC duplex receptacle modules and are designed for backbone Ethernet transmission systems. For 10G DWDM XENPAK transceivers, wavelengths are selectable from ITU-T channel C-band standards covering 45 DWDM grid wavelengths: 1528.77 nm to 1563.86 nm as specified by the ITU-T. All DWDM XENPAK transceivers are MAS compliant, RoHS6 compliant and lead free. Transmitting distance of DWDM XENPAK achieves 40km (ER) and 80km (ZR) with digital diagnostic monitoring. Fiberstore's DWDM XENPAK transceivers are designed to deploy in the DWDM networking equipment in metropolitan access and core networks.
Installing XENPAK Transceiver
To install XENPAK transceiver, you are supposed to follow these steps:
Step1: Remove the XENPAK transceiver module from its protective packing. (Do not remove the optical bore dust plug until you are directed to do so later in the procedure)
Step2: Check the label on the XENPAK transceiver module body to verify that you have the correct model for the network. (Make sure that the product number matches the desired band and channel)
Step3: Verify that the bale clasp on the front of the XENPAK transceiver module is closed before inserting the XENPAK transceiver module.
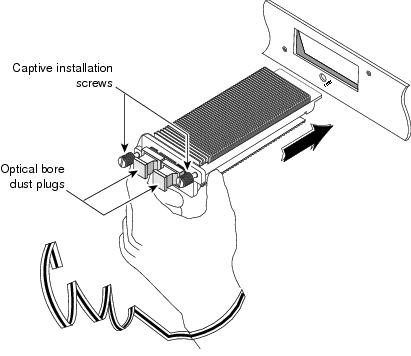
Step4: Align the XENPAK transceiver with the opening in the module faceplate, and slide the XENPAK transceiver into the opening until the XENPAK transceiver faceplate is in contact with the module faceplate. (This step ensures that the XENPAK transceiver is fully seated in the module socket)
Step5: Tighten the two captive installation screws to secure the XENPAK transceiver in the socket. Avoid cross-threading or over-tightening the captive screws.
Step6: Remove the dust plugs from the network interface and save the dust plugs for future use. Then remove the dust plugs from the XENPAK transceiver optical bores and save the dust plugs for future use.
Step7: Immediately attach the network interface to the XENPAK transceiver.

Fiberstore manufactures and supplies a complete range of XENPAK transceiver modules which can be customized. In addition, Fiberstore also provides compatible XENPAK transceivers as alternatives to those branded by Cisco, HP, Juniper Networks. The aim is to offer customers high-performance and cost-effective products to fulfill their requirements, contributing this way to the customer's success and satisfaction.
Originally published at www.sfp-transceiver-modules.com/wiki_list
No comments:
Post a Comment