Sunday, September 16, 2018

How to Mount a Network Switch to a Rack?

A network switch has been recognized as one of the most important devices for today’s networking technology. It allows simultaneous transmission of multiple packets and partition a network more efficiently than bridges or routers. The rack mount switch can be installed in a standard 19-inch equipment rack or on a desktop or shelf. So how do you mount a network switch to a rack to establish network wiring connections? Here’s a step-by-step guide to teach you how to mount a network switch to a rack.

Preparations Before Mounting the Network Switch

Before rack mounting the switch, please pay attention to the following factors:
  • Location: The site should be at the center of all the devices you want to link and near a power outlet, so that it is accessible for installing, cabling and maintaining the devices in the rack.
  • Temperature: Since the temperature within a rack assembly may be higher than the ambient room temperature, check that the rack-environment temperature is within the specified operating temperature range (0 to 40 °C).
  • Mechanical Loading: Do not place any equipment on top of a rack-mounted unit.
  • Circuit Overloading: Be sure that the supply circuit to the rack assembly is not overloaded.
  • Grounding: The switch rack should be properly grounded.

How to Mount a Network Switch to a Rack?

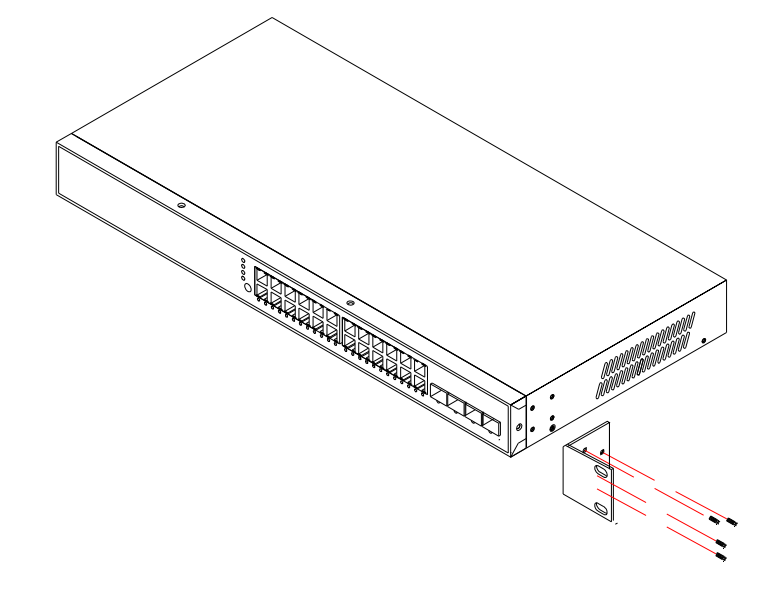
Step1. Attaching the Brackets to the Switch
Attach the brackets to the network switch using the screws provided in the mounting accessory.
network switch to rack
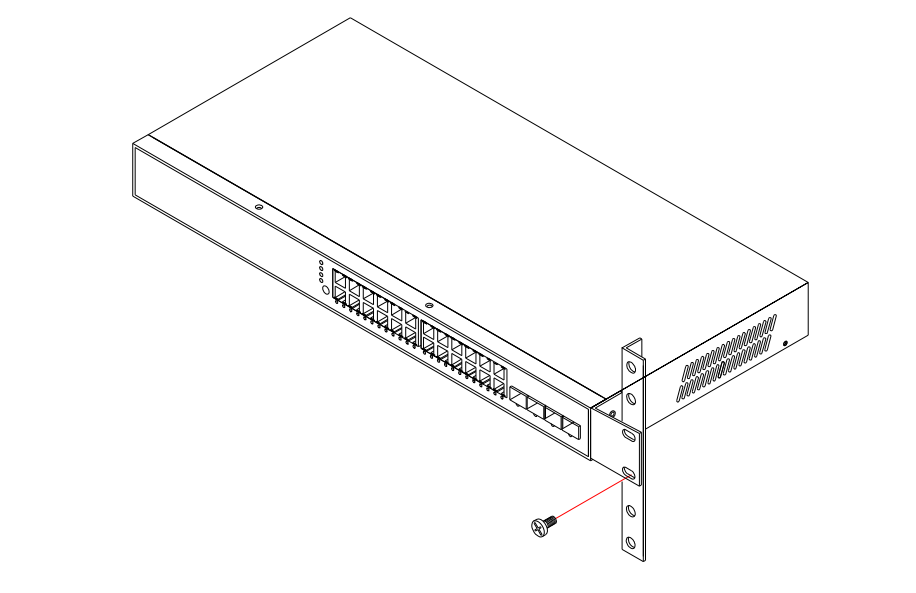
Step2. Installing the Switch in the Rack
Mount the switch in the rack with the optional rack mount kit, usually using the rack-mounting screws. Be sure to secure the lower rack-mounting screws first to prevent the brackets being bent by the weight of the switch.
switch rack
Step3. Adding Other Switches into the Rack
If there is only one data switch to be installed in the rack, then you can make the connection to a power source now. If there are multiple switches to be mounted, you need to install the another switch on the top of the first one in the rack, and then attach the power cords.
Step4. Attaching the Power Cords
After you complete mounting all of the switches in the rack, it’s time to connect the switch rack to the power source. Remember to verify that you have the correct power supply (AC-input or DC-input and the correct wattage) for your configuration.
Caution: To prevent bodily injury when mounting or servicing the switches in a rack, you must take special precautions to ensure that the system remains stable. The following guidelines are provided to ensure your safety:
  • This network switch should be mounted at the bottom of the rack if it is the only unit in the rack.
  • When mounting the switch in a partially filled rack, load the rack from the bottom to the top with the heaviest component at the bottom of the rack.
  • If the rack is provided with stabilizing devices, install the stabilizers before mounting or servicing the switches in the rack.

Establishing Network Wiring Connections

After mounting your network switches to a rack, you can establish the network wiring connections according to your requirements now. If you’re using a Gigabit Ethernet switch, it can be connected to 10, 100 or 1000Mbps network interface cards in PCs and servers, as well as to other switches and hubs. It may also be connected to remote devices using optional SFP transceivers. No matter which type of network switches you are using, make sure that they are securely mounted in the rack and connected to the corresponding networking wiring systems.

Monday, September 10, 2018

Proper Horizontal Cable Management for Rack

Cable management is a critical part of network cabling systems that require a large number of moves, adds and changes. The improper cable management may result in cable damage or cause transmission errors and performance issues as well as system downtime. In a horizontal manager system, the cable management for rack is important in telecommunications rooms for leased office space, brokerages and trading houses where the workstations will move or add additional ports frequently. This post will analyze why the horizontal rack cable management is important and offers FS horizontal cable management solutions for rack.

Why Is Proper Horizontal Rack Cable Management Important?

  • Poorly routed cables can lead to an assortment of problems over time. Jumbled cables would increase the risk of cables to be tangled up, and a possibility of interruption when reconnecting the cables.
  • The rack cable management is directly related to hardware safety. All equipment running on the server rack is going to generate heat, so organizing a rack with a conception involving space will help promote the airflow and hardware management.
  • Cable labels in a proper horizontal rack cable management can save a lot of time on troubleshooting. Just imagine how difficult it would be to trace a cable through that mess.
  • If rack cables were unorganized, a technician would spend hours tracing wires when something goes wrong. In most circumstances, we can’t afford to stay offline while a technician unravels a tangled nest of cables. Thus a proper horizontal cable management makes it easy for the technician to identify and access where goes wrong and fix it in far less time.

Horizontal Cable Management for Rack: Where to Start with?

Horizontal cable management system is often installed within racks or cabinets to manage cables on front racks and draw cables away from equipment neatly. The rack space of a horizontal cable management infrastructure is typically 1U or 2U high. The following part gives the FS plastic & metal horizontal fiber patch panel, cable managers, lacer panels to promote a proper cable management in your horizontal network cabling systems.
Horizontal Rackmount Fiber Patch Panel
Horizontal rackmount fiber patch panels help to organize cables and eliminate cable stress for your rack enclosure cabinet. FS offers 1U 19’’ blank rackmount fiber patch panels with plastic D-rings on the cable management panel and lacing bar. These rackmount fiber patch panels can be used to organize cables for fiber optic adapters, fiber enclosures, Ethernet switches, WDM chassis, etc.
Horizontal Cable Managers with Finger Duct & Brush Strip
Horizontal cable managers with finger duct and brush strip allow neat and proper routing of the patch cables from equipment in racks and protect cables from damage. Fixed inset fingers on the front and back allow easier access to the ports for moves, adds, and changes. And the brush strip horizontal cable manager is constructed of high-quality steel with high-density nylon bristles, which can promote proper airflow through the rack and meet the demand for front-to-back cable runs.
Horizontal Lacer Panel with D-rings
Horizontal lacer panels are efficient tools for rack or enclosure cabling. These D-rings on the lacer panel are essential to avoid cable strain and prevent damage to the ports on your rack-mount equipment. The five rotating D-rings can be easily assembled or disassembled manually according to your needs.

Conclusion

This post provides users with a horizontal cable management solution that simplifies cable routing in a finished professional appearance. With proper and efficient horizontal cable management tools, cable spaghetti is not a problem anymore. You can just have a peace of mind and reap the great benefits of sound cable management. FS horizontal cable management tools provide an efficient way to manage high performance copper, fiber optic, or coaxial cables on any 1U or 2U rack. For more details, please kindly visit www.fs.com.
Originally published at http://www.fiber-optic-tutorial.com/proper-horizontal-cable-management-rack.html